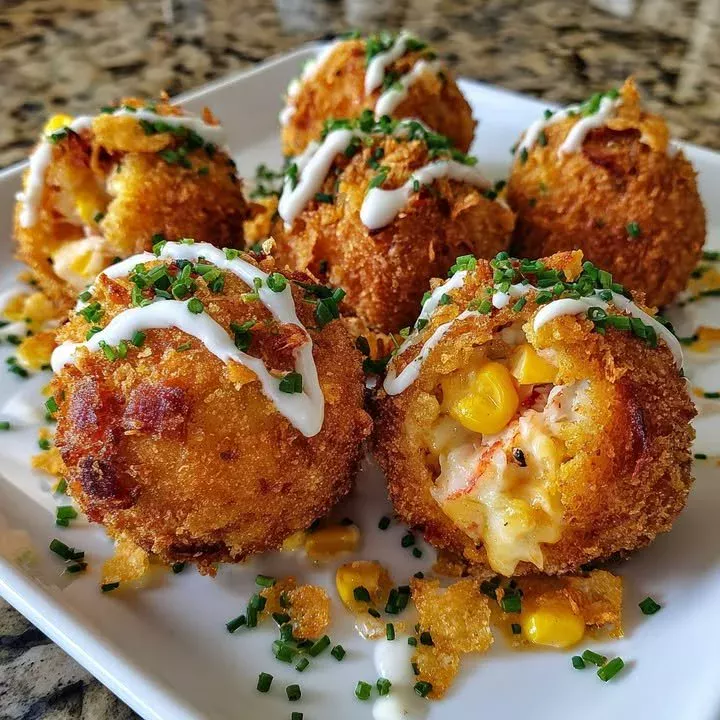
Cheesy Lobster Corn Balls are a delightful fusion of flavors that celebrate the ocean’s richness while providing a comforting bite that’s perfect for gatherings or family nights. This recipe is not only delicious but also straightforward, making it ideal for home cooks who want to impress without spending hours in the kitchen. With a crispy exterior and a creamy, cheesy center, these lobsters balls are sure to become a favorite. Let’s make this dish using a simple step-by-step guide that will leave your guests clamoring for more!
Ingredients
Gather these flavorful ingredients to craft your Cheesy Lobster Corn Balls:
- 1 cup cooked lobster meat, chopped – Sweet and succulent, the lobster adds a touch of indulgence.
- 1/2 cup canned sweet corn, drained – This adds a delightful and juicy pop of sweetness.
- 1 cup shredded cheddar cheese – Rich and melty, it brings a gooey texture that’s hard to resist.
- 1/2 cup cream cheese, softened – This makes the mixture creamy and luxurious.
- 1/2 tsp garlic powder – Just enough to add a savory depth of flavor.
- Salt & black pepper to taste – Essential seasoning to enhance all the flavors.
- 1 1/2 cups crushed cornflakes or panko (for coating) – For that perfect crispy crunch on the outside.
- 1/2 cup all-purpose flour – Provides a light coating to help the mixture adhere.
- 2 eggs, beaten – This will act as a binder during the coating process.
- Oil for frying – To achieve that golden brown finish.
- Sour cream or ranch drizzle (for garnish) – A creamy finish that complements the flavors.
- Fresh chopped chives (for garnish) – A pop of color and a slight oniony flavor to lighten up the dish.
These ingredients combine to create an ode to comfort food, with each bite offering a symphony of taste and texture that’s satisfying and fun to eat.
Step-by-Step Directions

-
Prepare the Mixture: In a bowl, combine the chopped lobster meat, drained corn, shredded cheddar, softened cream cheese, garlic powder, and season with salt and black pepper to taste. Mix until the ingredients are well blended, creating a creamy mixture that smells divine.
-
Chill the Mixture: Roll the mixture into golf ball-sized rounds and place them on a baking sheet. Chill them in the refrigerator for about 20 to 30 minutes. This step is essential as it helps the balls hold their shape during frying.
-
Coat the Balls: Once chilled, prepare your coating station. First, spread the all-purpose flour on one plate. In a separate bowl, beat the eggs. On another plate, spread the crushed cornflakes or panko. Now, take each ball, coat it lightly in flour, dip it into the beaten egg, and finally roll it in the cornflakes or panko until well coated.
-
Fry the Balls: Heat oil in a deep skillet or fryer to 350°F (175°C). Carefully drop the coated balls in batches, frying them for about 3 to 4 minutes or until they are crispy and golden brown on all sides. Ensure not to overcrowd the pan to maintain the oil temperature.
-
Drain and Garnish: Once cooked, remove the balls from the oil and drain them on paper towels to absorb excess oil. Drizzle with sour cream or ranch and sprinkle with fresh chives. Serve them hot for the best flavor and texture!
Tips & Tricks
To take your Cheesy Lobster Corn Balls to the next level, consider these helpful tips:
- Use fresh lobster whenever possible for the best flavor. If you can’t find fresh lobster, frozen is a great alternative.
- Experiment with cheese: While cheddar is rich and melty, you can also mix in other cheeses like Monterey Jack or mozzarella for varied flavors.
- Add spices: For a kick, consider adding a pinch of cayenne pepper or your favorite hot sauce to the mixture.
- Baking option: For a healthier alternative, you can bake the coated balls at 400°F (200°C) for about 15-20 minutes, flipping halfway through. They won’t be quite as crispy as fried, but still delicious!
Serving Suggestions & Pairings
These Cheesy Lobster Corn Balls make a fantastic snack or appetizer for a variety of occasions. They are perfect for:
- Game nights: Serve them alongside a refreshing drink for a fun evening.
- Family gatherings: Their comforting taste appeals to all ages, making them a hit among family members.
- Elegant parties: Garnish with a sprig of fresh chives and serve as a sophisticated bite at cocktail parties.
Pair them with a side of tangy dipping sauce such as sriracha mayo or a zesty lemon aioli to enhance the experience further.
Nutritional Information
Each serving of Cheesy Lobster Corn Balls offers about 150-200 calories, depending on size and the amount of oil absorbed during frying. They provide protein from the lobster and cheese while containing carbohydrates from the corn and flour. Enjoying these decadent bites in moderation is key to maintaining a balanced diet while indulging in comforting flavors.
Storing Tips & Variations
If you find yourself with leftovers (though unlikely!), here’s how to store them:
- Refrigerate: Place cooled Cheesy Lobster Corn Balls in an airtight container and refrigerate for up to 2 days.
- Freeze: For longer storage, you can freeze the uncooked balls. Lay them out on a baking sheet until frozen, then transfer them to a freezer bag. They can last for up to a month. Just fry them directly from the freezer when ready to enjoy!
- Chicken Variation: If you’re in the mood for something different, substitute the lobster with cooked shredded chicken for a twist on the flavor profile.
Conclusion
Now is the perfect time to try your hand at making Cheesy Lobster Corn Balls! With their creamy, cheesy filling and delightful crunch, this dish promises to delight your taste buds and leave you feeling satisfied. Don’t forget to share your experiences and tips with others who might look to recreate this culinary treat!
FAQs
-
Can I use frozen lobster for this recipe?
Yes, frozen lobster is a great alternative! Just ensure it is fully thawed and well-drained before use. -
How do I know when the oil is hot enough for frying?
You can test the oil by dropping a small piece of bread into it; if it sizzles and turns golden brown in about 60 seconds, the oil is ready. -
What can I serve with Cheesy Lobster Corn Balls?
These delicious balls pair well with dipping sauces like spicy mayo, ranch, or a tangy garlic aioli. A salad or fresh vegetables on the side can also provide a nice contrast. -
Can I bake these instead of frying?
Absolutely! For a healthier option, bake them at 400°F (200°C) until golden brown, flipping halfway through. -
How long do leftovers last?
Leftovers can be refrigerated for up to 2 days. For longer storage, freeze uncooked balls for up to a month and fry them as needed.
Create this scrumptious dish and prepare for compliments from everyone at your table!
Cheesy Lobster Corn Balls
Ingredients
For the Corn Balls
- 1 cup cooked lobster meat, chopped Sweet and succulent, adds indulgence.
- 1/2 cup canned sweet corn, drained Adds sweetness.
- 1 cup shredded cheddar cheese Rich and melty for gooey texture.
- 1/2 cup cream cheese, softened Creates a creamy interior.
- 1/2 teaspoon garlic powder Adds savory depth.
- to taste Salt & black pepper Essential seasoning.
- 1 1/2 cups crushed cornflakes or panko (for coating) Provides crispy crunch.
- 1/2 cup all-purpose flour Helps the mixture adhere.
- 2 eggs beaten Acts as a binder.
- Oil for frying For a golden brown finish.
- Sour cream or ranch drizzle (for garnish) A creamy complimentary finish.
- Fresh chopped chives (for garnish) Adds color and light flavor.
Instructions
Preparation
- In a bowl, combine the chopped lobster meat, drained corn, shredded cheddar, softened cream cheese, garlic powder, and season with salt and black pepper. Mix until well blended.
- Roll the mixture into golf ball-sized rounds and place them on a baking sheet. Chill in the refrigerator for 20 to 30 minutes.
Coating
- Prepare your coating station with flour on one plate, beaten eggs in a bowl, and crushed cornflakes or panko on another plate.
- Coat each ball lightly in flour, dip into the beaten egg, and roll in the cornflakes or panko until well coated.
Frying
- Heat oil in a deep skillet or fryer to 350°F (175°C). Fry the coated balls in batches for about 3 to 4 minutes until crispy and golden brown.
- Remove from oil and drain on paper towels to absorb excess oil.
Garnishing
- Drizzle with sour cream or ranch and sprinkle with fresh chives. Serve hot.